The Shade That Is Part III: Color & The Tools For Implementation
Now that we have discussed that there are essential requirements on how we can perceived color properly such as the light source; the object that absorbs, transmits, reflects or scatters the light from this source; and, the interpretation of the result by the human visual system wherein this aspect also includes the interaction between the observer and the light source, let’s delve on the things that can make you understand color and the equipment or materials that can assists you in minimizing or totally eradicate the mistake of choosing the wrong shade to our direct and indirect restorations.
Color is important in our Esthetic Dental Practice because no matter how great is your shaping and carving of the restoration or the crown or bridge done by your laboratory technician if it doesn't blend well with the natural teeth of your patient, then, you've simply wasted your time and effort. It is like fashion, even if you buy the most expensive brand of clothing, shoes and bag if your style is not properly color coordinated it will simply look like a mess and pile of expensive stuff.
So, in Color what we need to know and understand is how it works. There are three large bands of color, they are Red, Yellow and Blue. These are considered to be the Primary, or Basic colors of the spectrum. Mixing of Two of the light-mixture of Primary Colors produces Secondary Colors. Such as mixing Red and Yellow produces Orange, while Yellow and Blue produces Green while mixing Red and Blue produces Purple. The Primary and Secondary Colors can be arranged in the form of a wheel in which the individual colors form parts of the rim of the wheel, this arrangement has been called the Color Wheel or Color Circle. It is produced by bending the spectrum of light into a circle. In the color wheel, there is also what we consider as Complementary Colors. Complementary Colors are colors created opposite each other on the color wheel which when combined with Three Primary color results to Achromatic Color or produce a Grey-scale Color like White or Black.

The additive principle of complementary colors may be used to alter the value of restorations. For instance, if we want to lower the value (increase gray or darkness) of a restoration, the complementary color can be added to that hue (eg, A3 shade contains: orange hue + blue stain = lower value). Adding gray stain to lower the value will only make the restoration look dull. Adding violet (purple) stain to a B shade (yellow hue) restoration will also lower the value. In contrast, the value of a restoration (the brightness) cannot be easily raised.
In our field of restorations, it is very important that we understand what we can apply in our practice. I can blabber all about colors and shades but what we need to fully comprehend are 3 dimensions of the Munsell Color System and what are the gadgets we can use to assists us in translating the color perception that our eyes can see.
Albert Henry Munsell, developed what is called Munsell Color System. These three dimensions were defined as hue, value, and chroma. It is possible to vary each of these qualities without disturbing the other. The ability to understand each of these dimensions and separate them from one another is fundamental to an understanding of color as it relates to dental ceramics.
Color Perception is more accurate and has fewer Metamerism effects when color corrected lighting is used to evaluate the three components: Hue, Chroma, and Value.
I. HUE
It is a family or group of wavelengths that have a similar appearance (commonly called "color”). It is defined as the particular variety of a color. It is that quality by which we distinguish one color family from another such as red from yellow, or green from blue or purple. It is the family name we apply to a group of colors. There are ten hue families in the Munsell Color Order System, and they are designated by the following upper-case letters: Y for Yellow, GY for Green-Yellow, G for Green, BG for Blue-Green, B for Blue, PB for Purple-Blue, P for Purple, RP for Red-Purple, R for Red, and YR for Yellow-Red.

II. CHROMA
It is the level of saturation or the intensity or saturation of any particular hue. It is the quality of color by which we distinguish a strong color from a weak one; the degree of departure of a color sensation from that of white or gray; the intensity of a distinctive hue; color intensity. The chroma scale starts from zero, or achromatic, with increasing numeric values indicating stronger colors. In terms of chroma, color is defined by Munsell as weak, moderate, and strong. A strong chroma would be in the range of seven to ten. There are standards for very strong chromas above ten.
III. VALUE
The relative darkness or lightness of a color or the level of whiteness or darkness. It is that quality by which we distinguish a light color from a dark one. In other words, this is a colorless distinction. The possible range of values used in describing the lightness or darkness of a surface in the Munsell Color System extends from zero to ten. Black is zero and white is ten with a range of grays between. The value of a color is determined by which one of the grays it matches on the scale. Colors with low value numbers are termed Dark Colors, and one with high value numbers are called light colors. To compare the color match between a restoration and tooth, value is generally considered the most challenging of the three dimensions of color. One reason is that value differences are readily detected, even by an untrained eye, and restorations with improper value are frequently described by patients as being too dark or too white. In addition, value differences are more easily detected both close-up and at a distance, whereas differences in hue and chroma become less noticeable as the viewing distance increases.

What's Its Relevance To Us?
The color of teeth encompasses only a small portion of the total color space. The color ranges of human teeth have been measured by different researchers at different times and using different methods and color notation systems. Using the Munsell color notation system, Dr. E. B. Clark, a dentist, produced the first data in 1931. He indicated that the Hue ranged from 6 YR (yellow-red) to 9.3 Y (yellow), the Value ranged from 4 to 8, and the Chroma ranged from 0 to 7. Lemire and Burk found a Hue range from 8.9 YR to 3.3 Y, a Value range of 5.8 to 8, and a Chroma range from 0.8 to 3.4.3 Goodkind and Schwabacher identified the Hue range as 4.5 YR to 2.6 Y, the Value range as 5.7 to 8.5, and the Chroma range from 1.1 to 5.11 There are several other studies that used spectrophotometers and the findings were expressed in different color notation systems. However, all of the studies indicate that human teeth are in the yellow-red to yellow portion of the spectrum, they are relatively high in Value (light or bright), and they have a relatively low Chroma (not too much color intensity).
In other words, shade perception and color determination is a field of study defined by mathematics. Color interpretation is often defined scientifically in a mathematical 3-D format. The format can be plotted as seen in Munsell's color sphere.
Each color is a point in space represented by three components on X, Y, and Z planes and given the identification of LAB, which has been defined by the International Lighting Commission (Commission Internationale de l'Eclairage; CIE). The distance between any two colors in 3-D space is defined as Delta E. When the difference in Delta E is large enough, the eyes can perceive a difference.
In dentistry, some shade guides are available for color interpretation of restorative materials - tooth colors that have a Delta E difference between shade tabs so close together that the human eye cannot perceive a difference. Other times, neighboring tabs are so different it seems that tabs have been removed and are needed to fill the gap between two tabs. This explains why most shade guides can make the subjective evaluation and shade identification process difficult or impossible.
It is best to know and understand that when we are doing shade selection and using gadgets to translate our shade selection, we need to use the proper equipment or shade selector. I have a basic rules in my shade selections so that you will be able to translate better what is the tooth color versus the color of your restoration. The basic rule is to use the proper equipment or shade selector during your shade selection and the right light conditions.
1. For ceramics and indirect restorations we commonly use the Vita Shade Guide, and several years ago Chromascope was introduced. Although, there are other shade guide selectors in the market, these 2 are the most common shade selectors used in dental practice.
2. For composite resin restorations or direct restorations, it is best that the shade selector used are the ones included in your composite resin kits. It is best not to interchanged the shade selectors of composite resins for different brands because each composite resin brands have different level qualities that I’ve discussed before such as the opacity, translucency and fluorescent effects. These effects will come into play on how the shade of your composite resin will blend to the actual hue, chroma and value of your tooth.
 3. It is even easier to use shade taking devices that technology now offers. However, these devices don’t come cheap and knowing what is best to purchase requires better understanding how they work.
4. Photography or taking photos of your tooth right beside your shade selector also assists you in doing the final checking of your shade selection
5. The aide of using gadgets in terms of using the proper light conditions is also critical when doing your selections.
So, let’s discuss step by step what are the gadgets or equipment that are available in the market or/and I personally used that you may opt to use to assists you in your shade selection:
I. Shade Selection in Composite Resin Restorations:
1. I just use the shade tab available in the brand that I bought, and, as I’ve said do not interchange the shade guide selector of one composite resin brand to another.
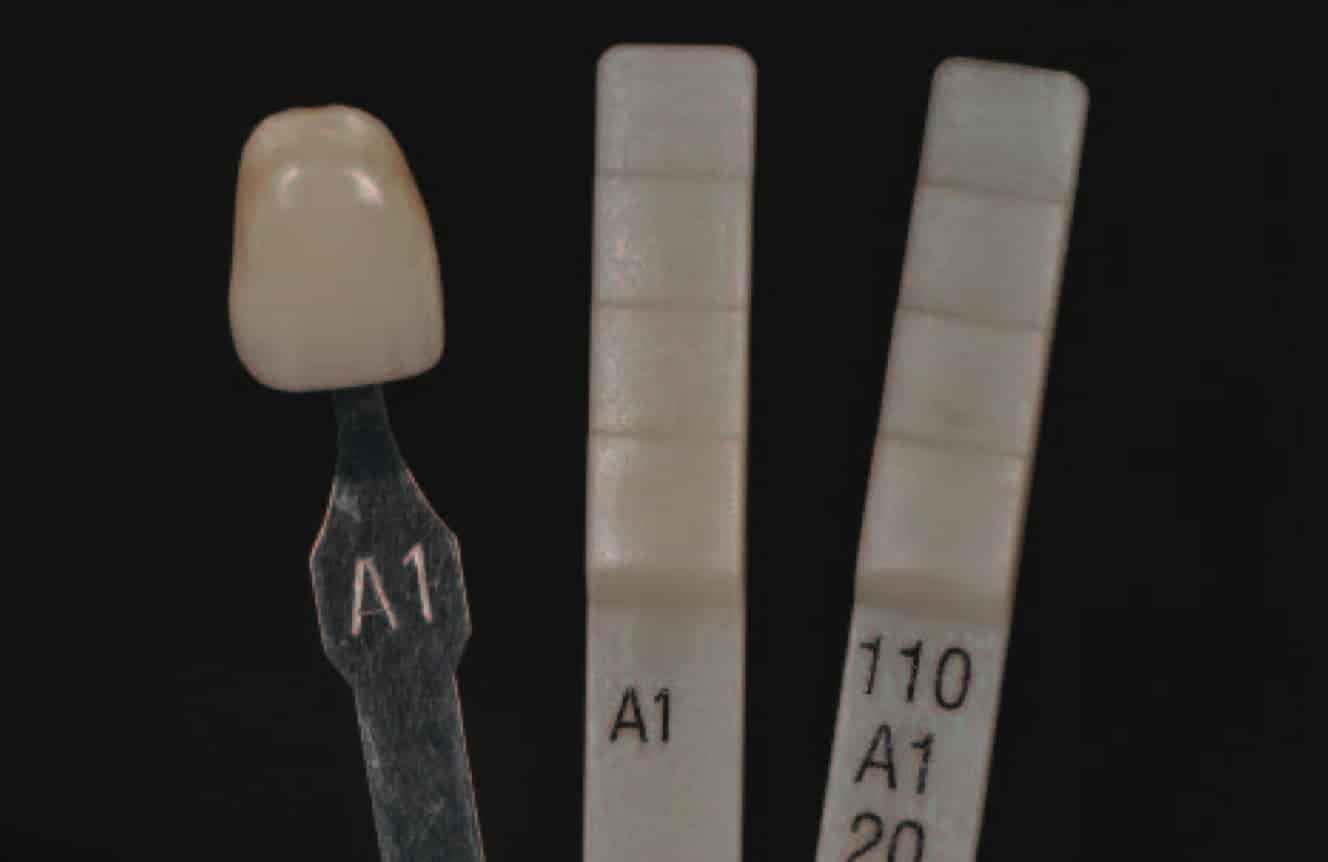
Example of different shade guides showing the same shade. The differences are obvious.
2. I make sure that if I do a selection of the shade, I take consideration first the hue and value of the shade selector versus the hue and value of the tooth I’m restoring.
IF the VALUE of the Shade TAB is LESSER THAN the VALUE of the Natural TOOTH:
- Select A New Shade Tab with HIGHER VALUE
- Consider that Your Composite Resin CANNOT Adjust to Higher Value to Match the Tooth Even IF Extrinsic Staining is Done.
-Consider You CANNOT Replicate the Value of the Tooth By Increasing the Thickness of Your Composite Resin Because this will ONLY Result to INCREASE in Opacity and Lesser Light Transmission
IF the VALUE of the Shade Tab is GREATER THAN the VALUE of the Natural TOOTH:
- Select A New Shade Tab with LOWER VALUE
- Consider that Your Composite Resin CAN Bridge the Gap of the Lower Value of the Tooth Through Extrinsic Staining is Done.
3. The chroma I adjust through the thickness of my composite resin application. Please take note that the thickness of the composite resin application will also adjust the translucency and opacity of your composite resin in effect when placed on your tooth.
4. Shade comparison should be performed prior to rubber dam application to prevent improper color matching that may occur due to subsequent tooth dehydration, which elevates values.
5. Some Dentists customize their shade selectors by building a tab from the composite resin they are actually going to use in their restoration. Doing this requires time and cost but provide more accuracy when you are trying to do an excellent aesthetic result. The shade matching process is initiated with color comparison of the individual composite shade tabs from the customized shade system.
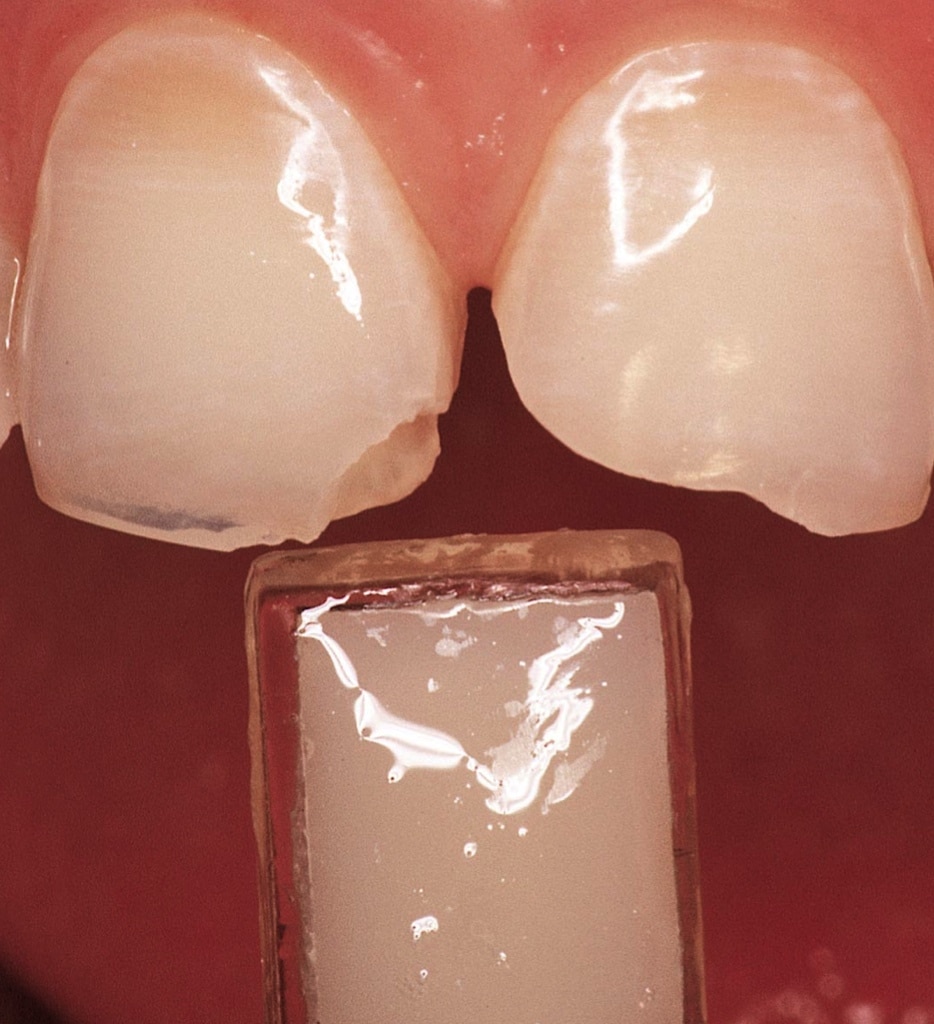
6. The composite tab/s are moistened with the patient’s saliva, and shade comparison is performed to the dentin base and translucent enamel shades of the patient’s dentin and enamel.
II. Shade Selection in Indirect Restoration Shade Selection Process:
To be CLEAR : My discussion here is NOT to promote a particular brand but what are commonly used as a shade guide selector by majority of dentists all over the world and what I may also use in my own practice.
The Most Common and Universal Shade Guide Selector used in dental practice and laboratories is the Vita Shade Guide and I’ve also used Chromascop, thus, that’s what I will discuss here. But, please take note that this shouldn’t limit you in finding what’s the brand of shade selector you should use. However, it is very CRITICAL that when you use a different brand of shade selector, make sure that your dental laboratory also has the system in their laboratory because at the end of the day, the shade you will select in your indirect restoration has to be properly and clearly translated to your laboratory technician. Or, you may use the Shade Conversion I provided below. If not, the difference of what you chose may not be properly reproduced on the end result.
1. Vita Classic Shade Selection

Many shade guide systems use hue as the basis to define color. Within each hue there are various levels of chroma (or saturation) to select from with no consideration for the Delta E difference between tabs. The third and most critical component for color selection (value) typically has no accountability and is not addressed in most shade guides. The VITA Classical Shade Guide is the most commonly used shade guide, but it's flawed because it does not address value.
A (hue of red-yellow) - A1, A2, A3, A3.5, A4
B (hue of yellow) - B1, B2, B3, B4
C (hue of gray) - C1, C2, C3, C4
D (hue of red-yellow-gray) - D2, D3, D4
Chroma is designated with numerical values 1, 2, 3 and 4
What's Its Relevance To Us?
When you use a Vita Classic Shade Guide, the first step is to choose the Hue. You have to choose whether your tooth color in comparison to the shade tab is A,B,C, or D. Then you define the Chroma of your Hue, and that’s where the 1, 2, 3, 3.5, and 4 are designated for each Hue of A, B, C, and D. Now, here’s the critical issue of using the Vita Shade Classic because it doesn’t provide you an arrangement to define the value of your hue. And, the reason why when you use this shade guide, you will need to re-arrange it according to the value of the color. It is important to take note why in Tooth Whitening when you define what is the result of your whitening treatment, the Vita Classic Shade Selection is arranged in this:
B1, A1, B2, D2, A2, C1, C2, D4, A3, D3, B3, A3.5, B4, C3, A4, C4
Value is most easily determined by observing the guide and teeth to be matched at a distance, standing slightly away from the chair and squinting. Squinting reduces the amount of light that reaches the retina. Therefore, stimulation of the cones is reduced while rods become more sensitive to the increasingly achromatic conditions. The dentist should concentrate on which disappears first - the tooth or the shade tab. The one that fades first has the lower value.
Following value selection, tabs selected for hue and chroma may not coincide with shade tab selected for value. If the Value of shade tab is lower than natural teeth then select new shade tab with higher value because one cannot increase value of restoration with extrinsic staining because it will only increase opacity of the restoration. If the Value of shade tab is higher than natural teeth then select new shade tab with lower value or bridge the difference with intrinsic or extrinsic staining.
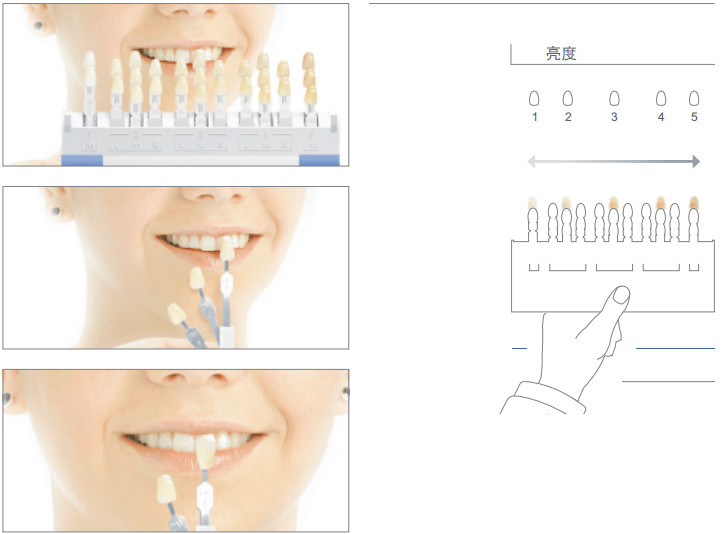
2. VITA 3D- Master Shade Guide

It was not until 1997 that value was added to a shade guide and used as the primary source of shade selection, with chroma and hue having less impact on the selection process. The VITA 3D- Master Shade Guide that revolutionized shade selection, making the process easier by basing color selection on value. With the 3D-Master Guide, as each color component is selected, it is held constant while the next color component is found. There's no other system available that allows this to be done. The 3D-Master attempts a three- dimensional analysis of tooth color. The tabs are arranged systematically and logically, rather than randomly as in the Classic guide. The tabs are grouped into five categories, sequentially numbered, with an increasing value (1, 2, 3, 4 and 5). All tabs within a value group have the same brightness. In a given value group, the chroma increases from top to bottom. All groups, with the exception of 1 and 5, are designated three letters, L, M and R, corresponding to varying hue. For example 2M2 corresponds to the second value group, the M hue sub- group and a 2-chroma level. For an intermediate tooth shade, a combination of two tabs is used for the final color prescription.
On a Personal Note: I’ve found this shade selector confusing. No matter how many times I tried to understand it, it is just simply complicated to me. Thus, if you prefer this shade selector, you can download the instruction here.
3. VITA Bleachedguide

The VITA Bleachedguide Shade Guide has 15 tabs and provides better color space coverage and wider distinguishable color choices with broader Delta E's, making it easier for doctors, staff, and patients to perceive color changes and shade interpretation.
The VITA Bleachedguide 3D-Master is designed primarily for observing and monitoring the patient's whitening process. The tabs are set in a simple to compare linear order, which allows for easier identification of value when selecting shades.
4. VITA Linearguide 3D Master
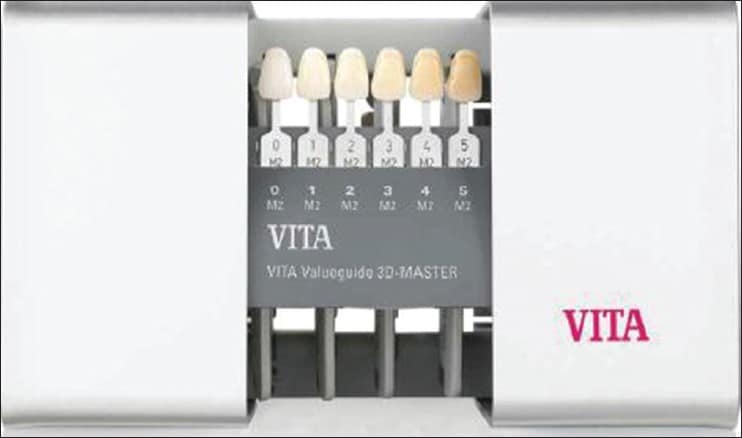
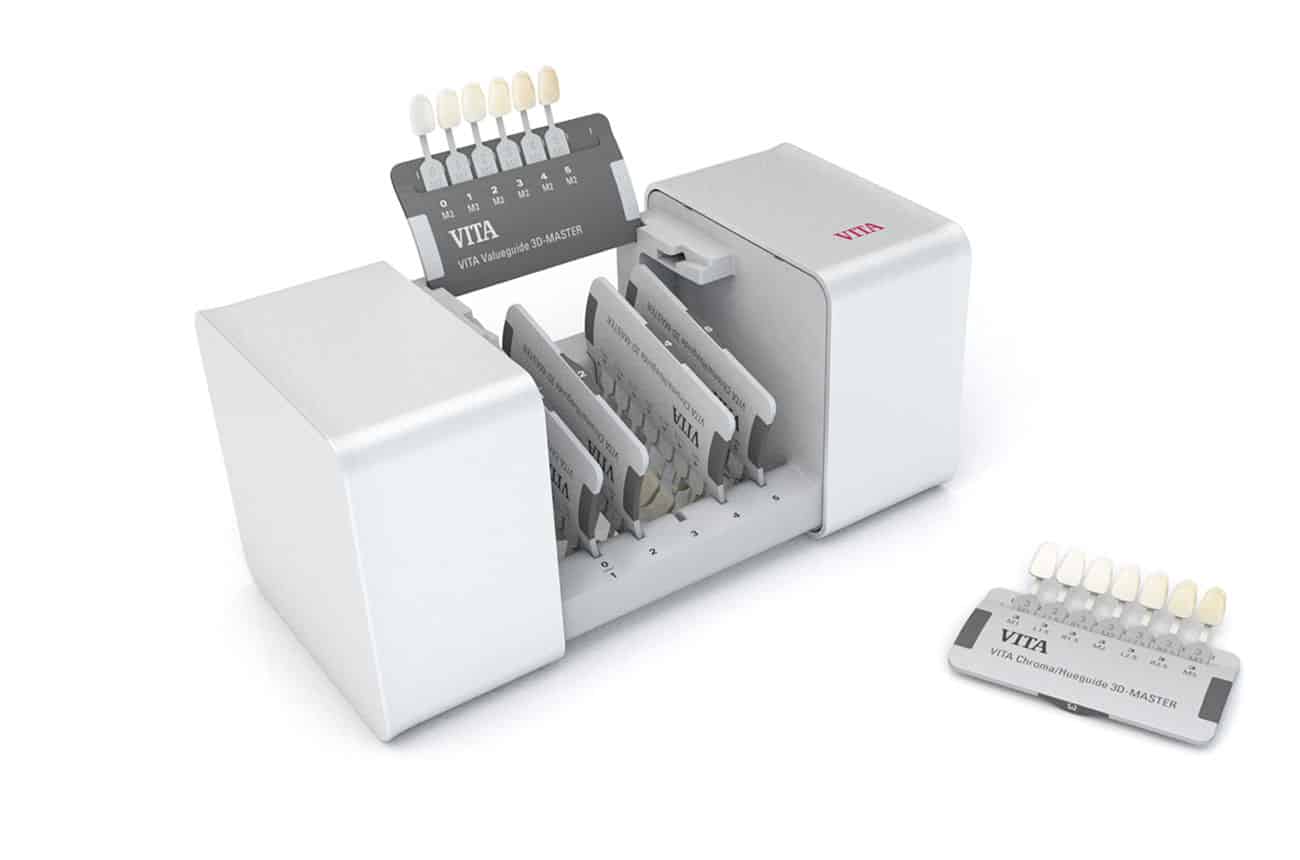
This simplifies the arrangement of the original VITA 3D-Master by separating the value tabs into their own holders. The chroma and hue tabs are arranged separately within each value group. This allows the dentist to quickly determine the value of the restoration before moving on to chroma and hue, and removes any potential confusion caused by the nonlinear arrangement of shade tabs in the current 3D-Master system.
On a Personal Note: I prefer this one rather than the VITA 3D- Master Shade Guide. However, making it simpler translates to making it more expensive for us. I guess, we have to accept the fact that anything in this world that will provide less hassle for us may it be for dentistry or not becomes expensive.
To delve more to this, this is the video link that I found and best describe on how to use this:
5. VITA Easy Shade Advance
I believe using technology is the easiest way to be able to take accurate shade. However, as I’ve mentioned before anything that is made easy for us translates to higher price. Thus, if you want to invest on something that will make your life easier and need not anymore understand anything except on how to use properly the gadget to maximize usage in your dental practice, then, this can certainly be an option for you. I actually would like to have this gadget in my clinic but as I’ve said it has to translate also in what will be the cost now of my restorations. However, there is an added value, of course, in your practice, this not only makes your shade selection near 100% shade accurate but can act as a marketing tool as this can be quite impressive to your patients as they observe on what equipment and technology you use in your clinic. This type of gadget is not yet in high demand due to cost, so, in my own humble opinion, as to when will I acquire this for my practice? Well, I will simply need to wait until it is, however, if you do have the budget for this, then, I do highly recommend it.
See this link for its instruction:
On a Personal Note: I am lucky enough to have tried this and able to play with it. This includes a software that can help you assist in mapping your final restoration and just e-mail your plan to your laboratory technician for implementation. The software is super useful to use to make it personalized to each of your patients’ restoration. However, it does require you to understand its technical manipulation. If you are not on the techy side or your assistant doesn’t understand software applications, then, this is something you may not enjoy as much as I did.
6. Chromascop

The Chromascop uses numbers to distinguish hue, such as 100 (white), 200 (yellow), 300 (orange), 400 (grey) and 500 (brown). Chroma is indicated by another set of numbers, 10 are high value with low chroma, while 40 is low value with high chroma. A conversion chart is available to convert Chromascop shade tabs to the Vita Classic shades.
The Chromascop shade guide represents the shade standard for Ivoclar Vivadent products. With the logical arrangement of the individual shades, the Chromascop permits exact and efficient shade determination. The 20 shades are divided into five detachable shade groups. Once the basic shade has been selected, the correct shade within the shade group can be determined. Ignoring any superfluous effects such as cervicals, transparent areas, intensive discolouration in the incisal and dentin areas, as well as surface characterizations makes it much easier to determine the correct shade.
Chroma and value are communicated by another system of numbers:
• 10= Least chromatic, highest value
• 40= Most chromatic, lowest value
Convert Your Chromascop or Bioform Shade Guide to Vita Shade Guide through this Conversion Guide
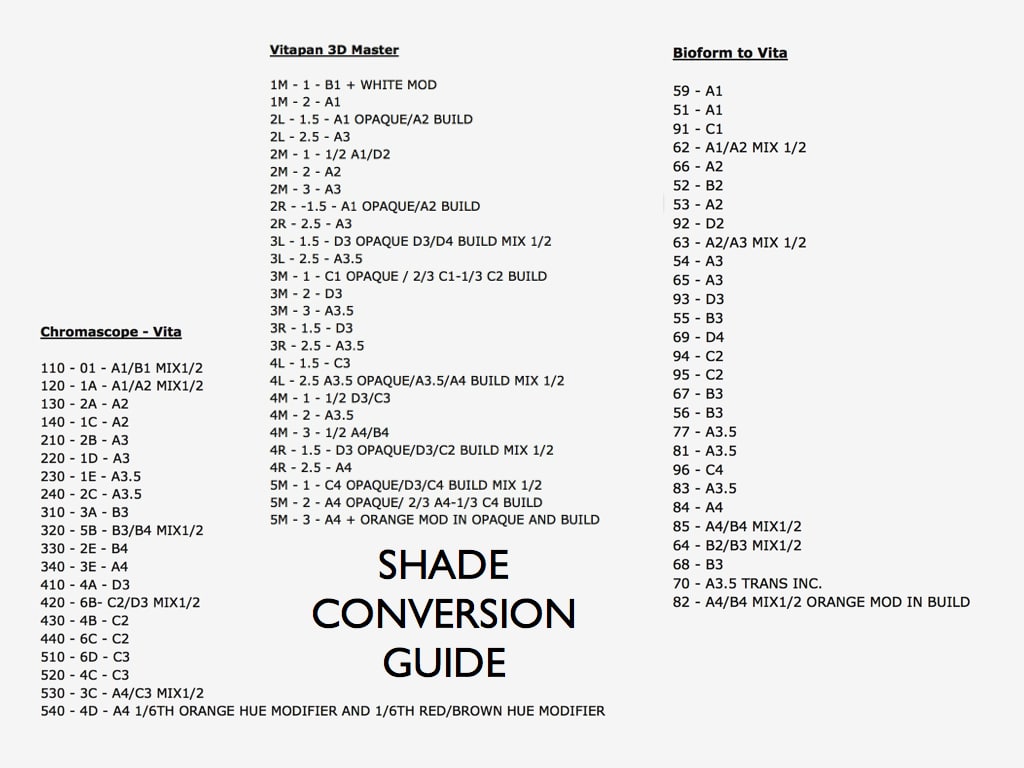
Use this Conversion Guide to Convert Your Chromascop or Bioform Shade Guide to Vita Shade In Case Your Lab Don't Have Your Shade Guide.
On A Personal Note: I used this shade guide when my indirect restoration will be IPS Empress, E-Max and if I will use their pontics. Again, it is critical to use the shade guide that corresponds to the brand material you are going to use for your final restoration.
III. For your Photography Assistance In Your Shade Selection & Shade Mapping:
Photography provides us much more in terms of recording our cases and treatment implementation but it also assists us in doing an accurate shade selection and transmitting our result to the lab technician if we are doing indirect restoration.
However, like our eyes photography requires assistance in the light and environmental conditions, we need to take note on the following protocols so that photography can assists us better for our shade selection and translating it to the one who will implement our instruction:
1. Avoid the large reflection areas of the metal parts of the shade guide as they reduce the detail of the pictures
2. Take pictures using two different shade tabs.
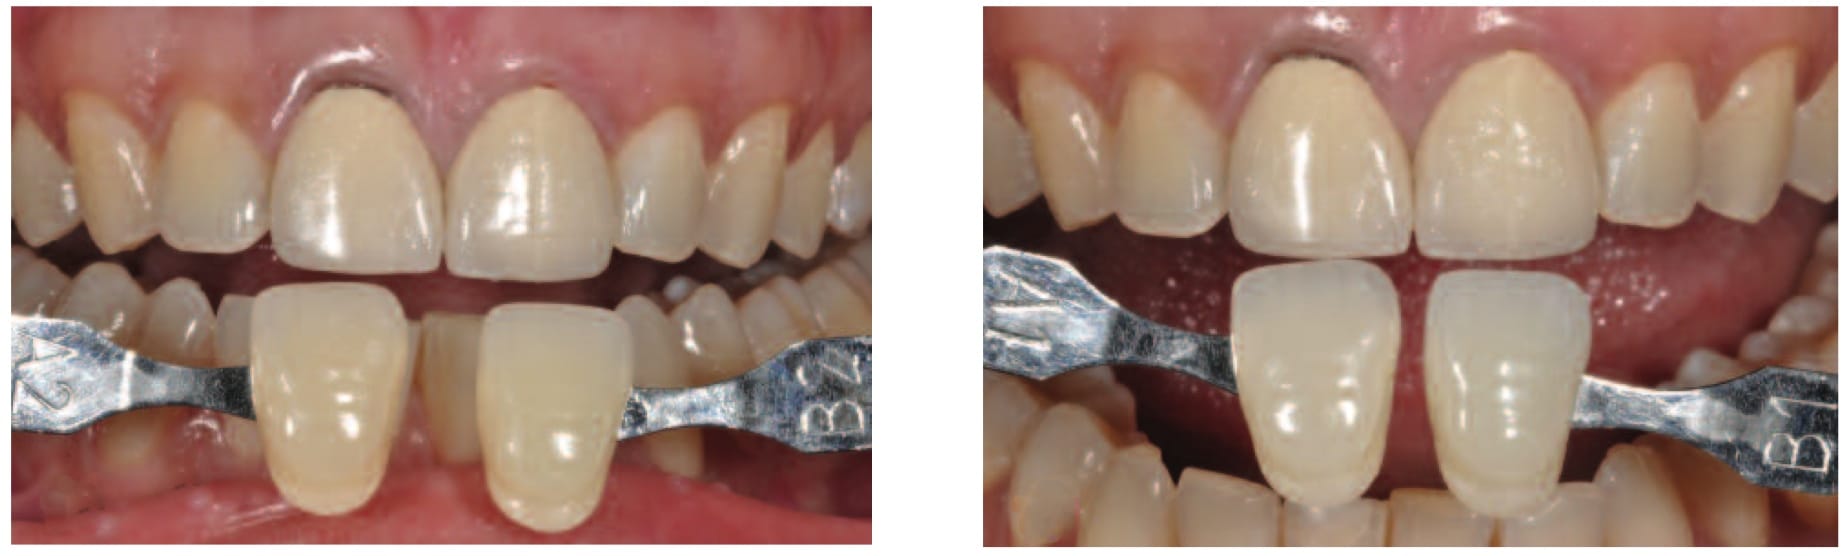
3. The surface of the shade tab must be at exactly the same level of the buccal surface of the teeth, as even minor discrepancies can make a tooth look darker or brighter due to the power of the flash.
4. The incisal edge of the tabs should be at roughly 1mm distance from the natural teeth, or as close as possible,
without touching each other.
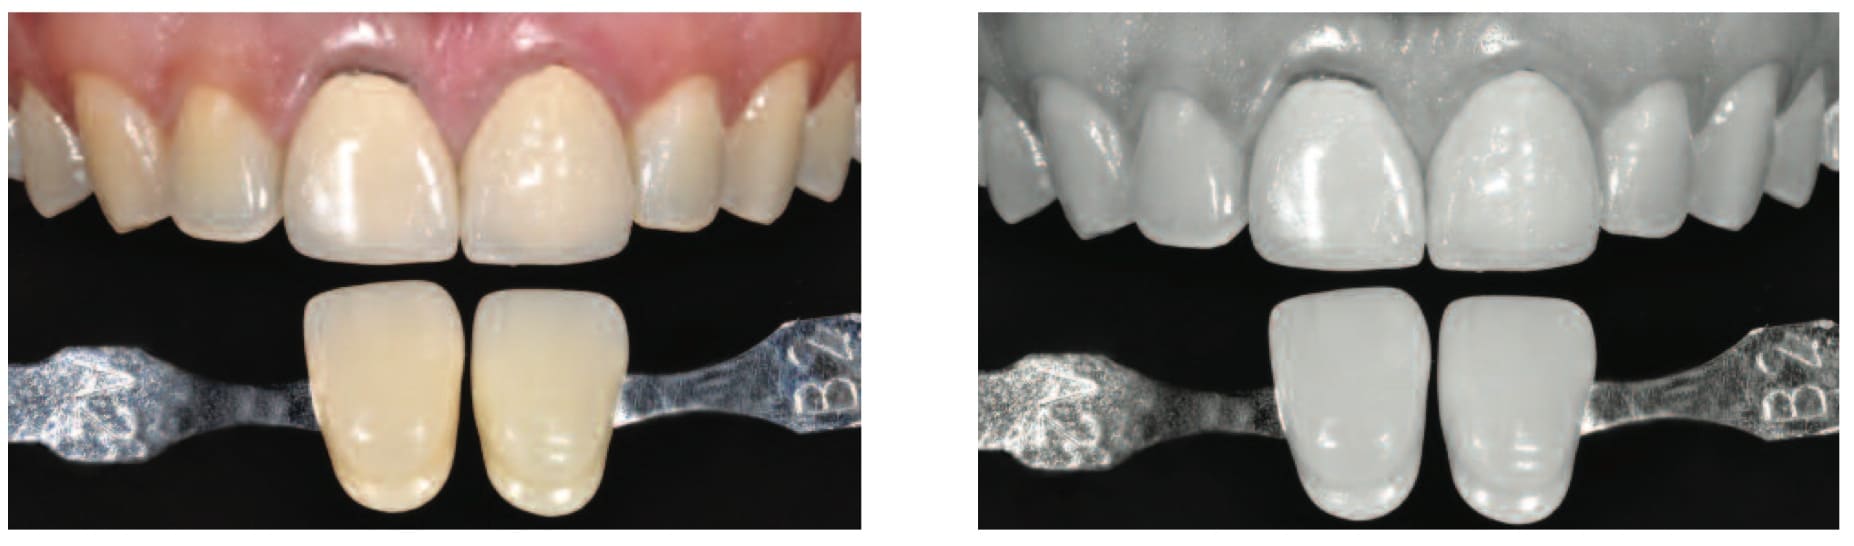
5. Take pictures with and without contrasters. This is especially relevant in milk and newly erupted or young permanent teeth with opalescent areas and clear halo effects.
6. In cases where an all-ceramic restoration is planned, the shade of the stump should also be given to the lab, using a special shade guide, such as the natural die material shade guide of the IPS e.max system (Ivoclar Vivadent).
7. Consider taking some pictures in black and white or convert your colored photo to black and white using a photo application. A black and white photograph will help show the value of the shade tab in relation to the patient’s tooth.
In transmitting our shade selection to be adapted to the actual result in our restoration can be achieved through proper communication to our laboratory technician, we either deliver it through print, digital transmission such as e-mail or through shade mapping.
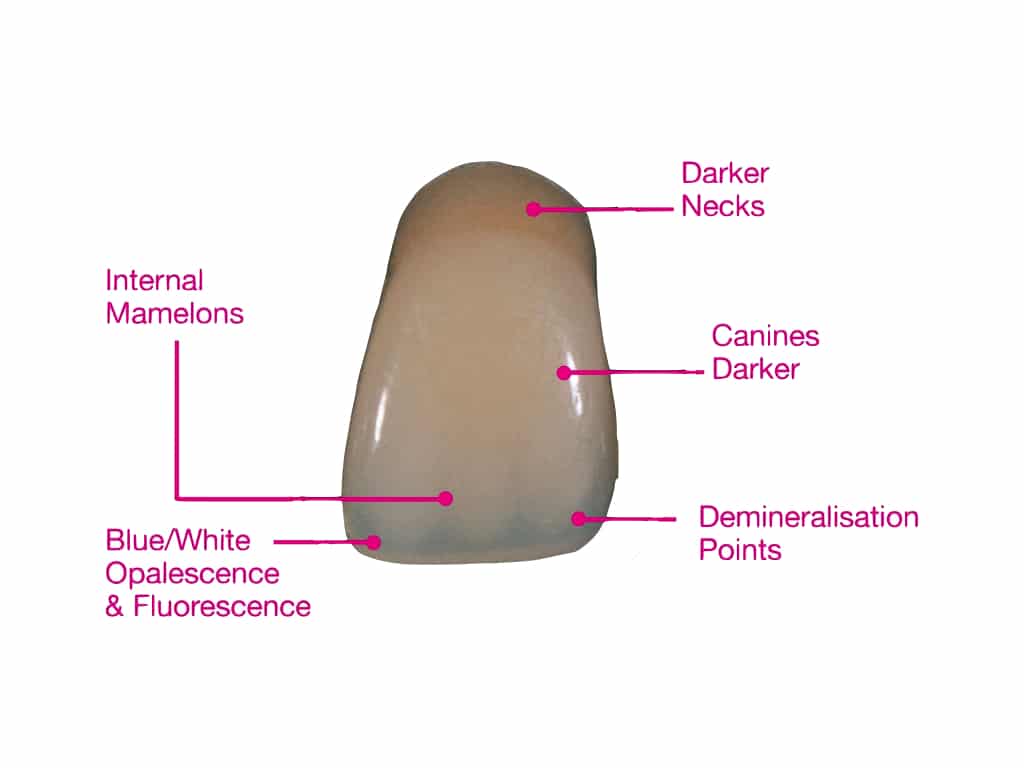
Shade Mapping:
We can do shade mapping in a simple manner as shown on this video I found through YouTube.
Or, in our Direct Restoration which has this Sample Guide;


IV. For Light Conditions & Technology Advancements:
The quality of light source is the most influential factor when we determining tooth shade. The ideal light source is natural light, occurring around mid-day for accurate color comparison. The time of the day, month and weather conditions affect the color of sunlight. If the light source changes, then the light reflected from an object changes too; in that case, a different color is perceived. The absence of ideal conditions has led to the use of artificial lighting for color matching. The light source that approximates standard daylight is ideal for shade matching. Color temperature, spectral reflection curves and Color Rendering Index (CRI) are all used to measure the capacity to reproduce standard daylight (CRI over 90 is recommended for color matching).
As technology improves, shade taking devices and dental headlights are improved to imitate the quality of the light source we need to take as much as an accurate shade of the tooth we are restoring. These shade taking devices such as the VITA Easy Shade Advance I mentioned above uses two main categories for dental color analysis. These are the following:
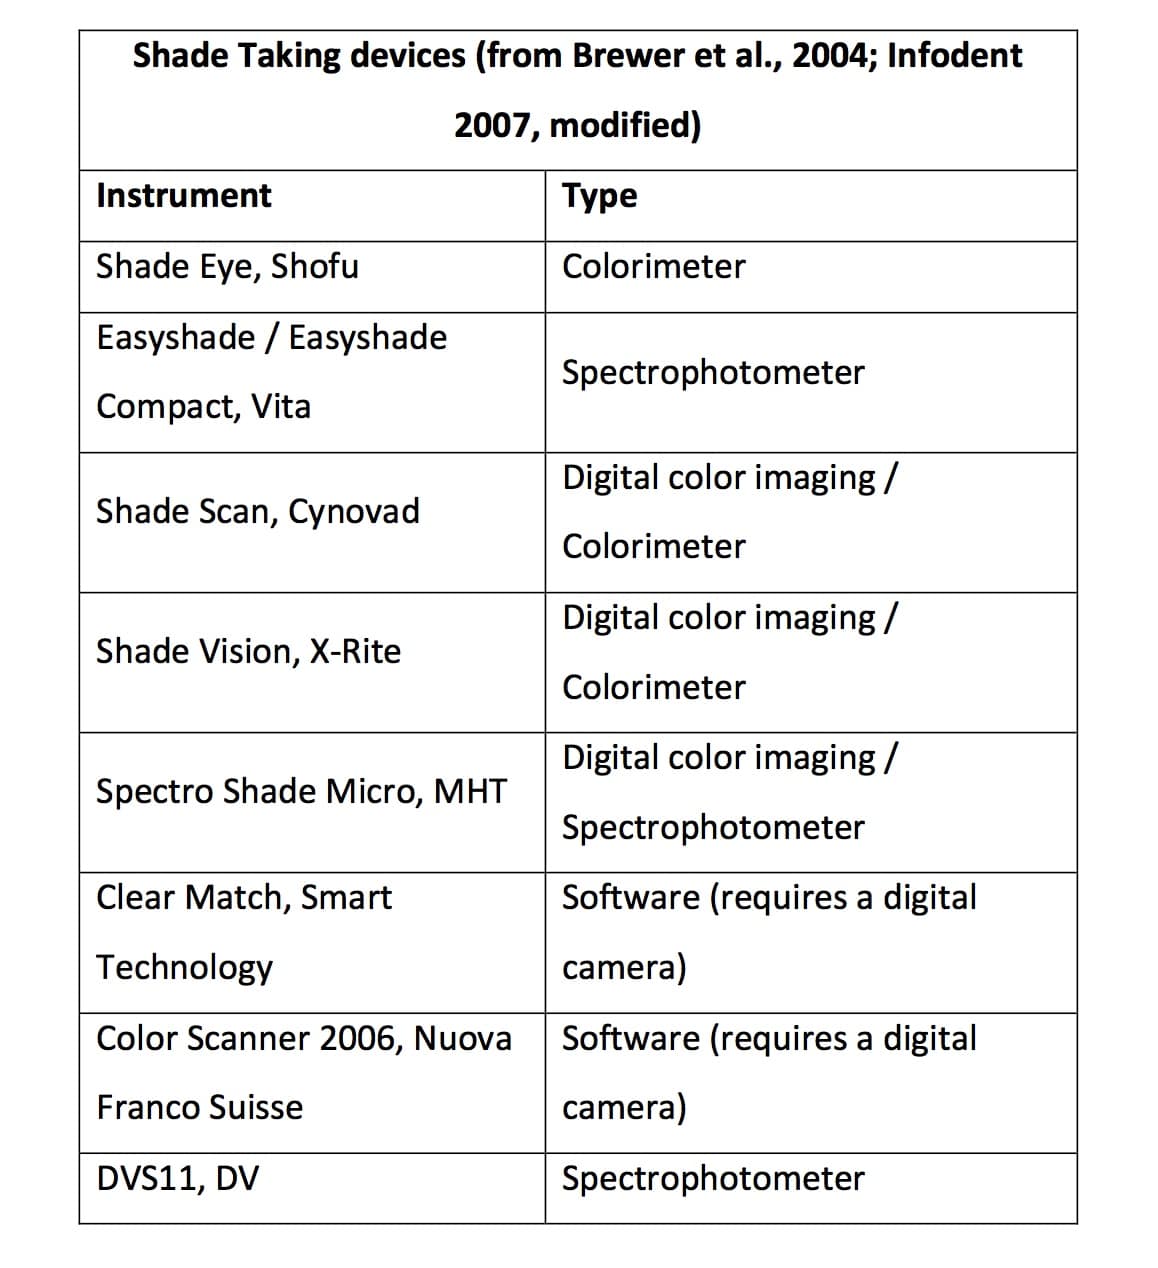
1. Colorimeter
It is relatively simple and low-cost instrument. It is designed to measure color on the basis of 3 axis or stimuli by using a filter that stimulates the human eye. Colorimeters are difficult to design, and if the technology is not precise the result will be a reduction in accuracy compared with a spectrophotometer. Properly designed colorimeters can provide greater data efficiency, as they only store the needed three data points of hue, value, and chroma instead of the more basic 16 to 32 data points of reflectance.
2. Spectrophotometer
It is a more sophisticated instrument built to measure by reflection or transmission of an observed object, giving the entire spectral curve and limiter for color measurement to the visible frequency range of 350-800 nm. These instruments typically divide and measure the visual spectrum into multiple parts, resulting in 16 to 32 data points across that range. To date, all instruments offered to dental practitioners have been spectrocolorimeters. A spectrocolorimeter performs a second data processing step to convert the reflective data to colorimetric data.
Here are the List of Gadgets that Indicates Whether Colorimeter or Spectrophotometer Is Used:
If we don’t have the capacity to purchase gadgets as mentioned, we have alternative methods to improve the lighting conditions in our clinics. There are already dental chairs available in the market that offer head lights specifically to give the ideal lighting conditions so we can achieve proper shade selection such as Belmont, to name one.

I’ve used Rite Lite instead as I don’t have a dental chair that provides the ideal light. Rite Lite portable and wireless light-correcting device that has been designed to assists chairside shade matching. The aluminum-clad device consists of a ring with a 3cm window-hole (for viewing the patient’s teeth) attached to an ergonomic handle. The ring contains 12 LEDs that illuminate the dentition equally from all directions to avoid glare, distortion, and direct reflections. The brightness of the Rite Lite eliminates the color distortion caused by the color of the dental chair, the operatory, and even brightly colored clothing. However, a color neutral grey or blue bib is still recommended. Six of the diodes are set at 5500°K, while the others produce 3200°K. Battery operated (2 AA cells) and lightweight (185g), the Rite Lite can be used by any member of the dental team. If the battery level falls below the critical power required for full illumination, the device notifies the user. Currently, they have Rite Lite 2 that provides even more ideal light source than the one I have.

The things we know and understand will never result to its proper fruition if we don’t adapt it in the way we practice. It is easier to write and teach you how to do it properly than we adapting it in our everyday dental practice. Our interest to really apply the right protocols and conditions in implementing what you’ve read here, adapting it in your cases and treatments as well as properly transmitting the information to your laboratory technicians to implement your instruction will require from you great discipline, professionalism and interest to indeed achieve a true aesthetic restoration to your patients.
[dvk_social_sharing] [et_bloom_inline optin_id="optin_1"]